Over at Math3ma, Tai-Danae Bradley shared the following puzzle, which she also featured in a fantastic (spoiler-free) YouTube video. If you’re seeing this for the first time, watch the video first.
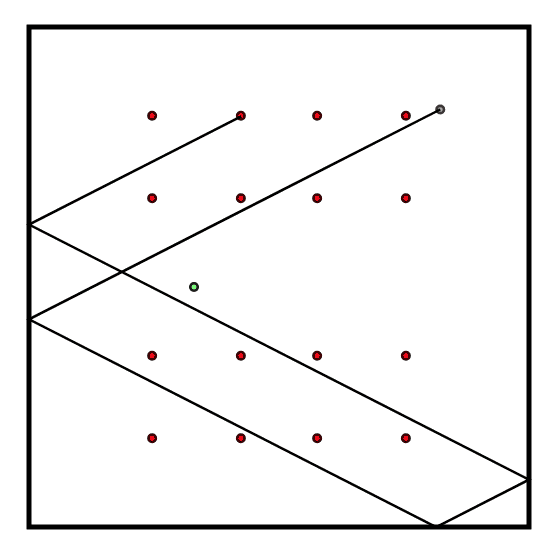
Consider a square in the xy-plane, and let A (an “assassin”) and T (a “target”) be two arbitrary-but-fixed points within the square. Suppose that the square behaves like a billiard table, so that any ray (a.k.a “shot”) from the assassin will bounce off the sides of the square, with the angle of incidence equaling the angle of reflection.
Puzzle: Is it possible to block any possible shot from A to T by placing a finite number of points in the square?
This puzzle found its way to me through Tai-Danae’s video, via category theorist Emily Riehl, via a talk by the recently deceased Fields Medalist Maryam Mirzakhani, who studied the problem in more generality. I’m not familiar with her work, but knowing mathematicians it’s probably set in an arbitrary complex $ n$-manifold.
See Tai-Danae’s post for a proof, which left such an impression on me I had to dig deeper. In this post I’ll discuss a visualization I made—now posted at the end of Tai-Danae’s article—as well as here and below (to avoid spoilers). In the visualization, mouse movement chooses the firing direction for the assassin, and the target is in green. Dragging the target with the mouse updates the position of the guards. The source code is on Github.
Outline
The visualization uses d3 library, which was made for visualizations that dynamically update with data. I use it because it can draw SVGs real nice.
The meat of the visualization is in two geometric functions.
- Decompose a ray into a series of line segments—its path as it bounces off the walls—stopping if it intersects any of the points in the plane.
- Compute the optimal position of the guards, given the boundary square and the positions of the assassin and target.
Both of these functions, along with all the geometry that supports them, is in geometry.js. The rest of the demo is defined in main.js, in which I oafishly trample over d3 best practices to arrive miraculously at a working product. Critiques welcome 🙂
As with most programming and software problems, the key to implementing these functions while maintaining your sanity is breaking it down into manageable pieces. Incrementalism is your friend.
Vectors, rays, rectangles, and ray splitting
We start at the bottom with a Vector class with helpful methods for adding, scaling, and computing norms and inner products.
function innerProduct(a, b) {
  return a.x * b.x + a.y * b.y;
}

class Vector {
  constructor(x, y) {
    this.x = x;
    this.y = y;
  }

  normalized() { ... }
  norm() { ... }
  add(vector) { ... }
  subtract(vector) { ... }
  scale(length) { ... }
  distance(vector) { ... }
  midpoint(b) { ... }
}
This allows one to compute the distance between two points, e.g., with vector.subtract(otherVector).norm().
Next we define a class for a ray, which is represented by its center (a vector) and a direction (a vector).
class Ray {
  constructor(center, direction, length=100000) {
    this.center = center;
    this.length = length;

    if (direction.x == 0 && direction.y == 0) {
      throw "Can't have zero direction";
    }
    this.direction = direction.normalized();
  }

  endpoint() {
    return this.center.add(this.direction.scale(this.length));
  }

  intersects(point) {
    let shiftedPoint = point.subtract(this.center);
    let signedLength = innerProduct(shiftedPoint, this.direction);
    let projectedVector = this.direction.scale(signedLength);
    let differenceVector = shiftedPoint.subtract(projectedVector);

    if (signedLength > 0
        && this.length > signedLength
        && differenceVector.norm() < intersectionRadius) {
      return projectedVector.add(this.center);
    } else {
      return null;
    }
  }
}
The ray must be finite for us to draw it, but the length we’ve chosen is so large that, as you can see in the visualization, it’s effectively infinite. Feel free to scale it up even longer.
assassin-puzzle
The interesting bit is the intersection function. We want to compute whether a ray intersects a point. To do this, we use the inner product as a decision rule to compute the distance of a point from a line. If that distance is very small, we say they intersect.
In our demo points are not infinitesimal, but rather have a small radius described by intersectionRadius. For the sake of being able to see anything we set this to 3 pixels. If it’s too small the demo will look bad. The ray won’t stop when it should appear to stop, and it can appear to hit the target when it doesn’t.
Next up we have a class for a Rectangle, which is where the magic happens. The boilerplate and helper methods:
class Rectangle {
  constructor(bottomLeft, topRight) {
    this.bottomLeft = bottomLeft;
    this.topRight = topRight;
  }

  topLeft() { ... }
  center() { ... }
  width() { .. }
  height() { ... }
  contains(vector) { ... }
The function rayToPoints that splits a ray into line segments from bouncing depends on three helper functions:
rayIntersection: Compute the intersection point of a ray with the rectangle.isOnVerticalWall: Determine if a point is on a vertical or horizontal wall of the rectangle, raising an error if neither.splitRay: Split a ray into a line segment and a shorter ray that’s “bounced” off the wall of the rectangle.
(2) is trivial, computing some x- and y-coordinate distances up to some error tolerance. (1) involves parameterizing the ray and checking one of four inequalities. If the bottom left of the rectangle is $ (x_1, y_1)$ and the top right is $ (x_2, y_2)$ and the ray is written as $ \{ (c_1 + t v_1, c_2 + t v_2) \mid t > 0 \}$, then—with some elbow grease—the following four equations provide all possibilities, with some special cases for vertical or horizontal rays:
$$\displaystyle \begin{aligned} c_2 + t v_2 &= y_2 & \textup{ and } \hspace{2mm} & x_1 \leq c_1 + t v_1 \leq x_2 & \textup{ (intersects top)} \\\ c_2 + t v_2 &= y_1 & \textup{ and } \hspace{2mm} & x_1 \leq c_1 + t v_1 \leq x_2 & \textup{ (intersects bottom)} \\\ c_1 + t v_1 &= x_1 & \textup{ and } \hspace{2mm} & y_1 \leq c_2 + t v_2 \leq y_2 & \textup{ (intersects left)} \\\ c_1 + t v_1 &= x_2 & \textup{ and } \hspace{2mm} & y_1 \leq c_2 + t v_2 \leq y_2 & \textup{ (intersects right)} \\\ \end{aligned}$$In code:
  rayIntersection(ray) {
    let c1 = ray.center.x;
    let c2 = ray.center.y;
    let v1 = ray.direction.x;
    let v2 = ray.direction.y;
    let x1 = this.bottomLeft.x;
    let y1 = this.bottomLeft.y;
    let x2 = this.topRight.x;
    let y2 = this.topRight.y;

    // ray is vertically up or down
    if (epsilon > Math.abs(v1)) {
      return new Vector(c1, (v2 > 0 ? y2 : y1));
    }

    // ray is horizontally left or right
    if (epsilon > Math.abs(v2)) {
      return new Vector((v1 > 0 ? x2 : x1), c2);
    }

    let tTop = (y2 - c2) / v2;
    let tBottom = (y1 - c2) / v2;
    let tLeft = (x1 - c1) / v1;
    let tRight = (x2 - c1) / v1;

    // Exactly one t value should be both positive and result in a point
    // within the rectangle

    let tValues = [tTop, tBottom, tLeft, tRight];
    for (let i = 0; i  epsilon && this.contains(intersection)) {
        return intersection;
      }
    }

    throw "Unexpected error: ray never intersects rectangle!";
  }
Next, splitRay splits a ray into a single line segment and the “remaining” ray, by computing the ray’s intersection with the rectangle, and having the “remaining” ray mirror the direction of approach with a new center that lies on the wall of the rectangle. The new ray length is appropriately shorter. If we run out of ray length, we simply return a segment with a null ray.
  splitRay(ray) {
    let segment = [ray.center, this.rayIntersection(ray)];
    let segmentLength = segment[0].subtract(segment[1]).norm();
    let remainingLength = ray.length - segmentLength;

    if (remainingLength < 10) {
      return {
        segment: [ray.center, ray.endpoint()],
        ray: null
      };
    }

    let vertical = this.isOnVerticalWall(segment[1]);
    let newRayDirection = null;

    if (vertical) {
      newRayDirection = new Vector(-ray.direction.x, ray.direction.y);
    } else {
      newRayDirection = new Vector(ray.direction.x, -ray.direction.y);
    }

    let newRay = new Ray(segment[1], newRayDirection, length=remainingLength);
    return {
      segment: segment,
      ray: newRay
    };
  }
As you have probably guessed, rayToPoints simply calls splitRay over and over again until the ray hits an input “stopping point”—a guard, the target, or the assassin—or else our finite ray length has been exhausted. The output is a list of points, starting from the original ray’s center, for which adjacent pairs are interpreted as line segments to draw.
  rayToPoints(ray, stoppingPoints) {
    let points = [ray.center];
    let remainingRay = ray;

    while (remainingRay) {
      // check if the ray would hit any guards or the target
      if (stoppingPoints) {
        let hardStops = stoppingPoints.map(p => remainingRay.intersects(p))
          .filter(p => p != null);
        if (hardStops.length > 0) {
          // find first intersection and break
          let closestStop = remainingRay.closestToCenter(hardStops);
          points.push(closestStop);
          break;
        }
      }

      let rayPieces = this.splitRay(remainingRay);
      points.push(rayPieces.segment[1]);
      remainingRay = rayPieces.ray;
    }

    return points;
  }
That’s sufficient to draw the shot emanating from the assassin. This method is called every time the mouse moves.
Optimal guards
The function to compute the optimal position of the guards takes as input the containing rectangle, the assassin, and the target, and produces as output a list of 16 points.
/*
 * Compute the 16 optimal guards to prevent the assassin from hitting the
 * target.
 */
function computeOptimalGuards(square, assassin, target) {
...
}
If you read Tai-Danae’s proof, you’ll know that this construction is to
- Compute mirrors of the target across the top, the right, and the top+right of the rectangle. Call this resulting thing the 4-mirrored-targets.
- Replicate the 4-mirrored-targets four times, by translating three of the copies left by the entire width of the 4-mirrored-targets shape, down by the entire height, and both left-and-down.
- Now you have 16 copies of the target, and one assassin. This gives 16 line segments from assassin-to-target-copy. Place a guard at the midpoint of each of these line segments.
- Finally, apply the reverse translation and reverse mirroring to return the guards to the original square.
Due to WordPress being a crappy blogging platform I need to migrate off of, the code snippets below have been magically disappearing. I’ve included links to github lines as well.
Step 1 (after adding simple helper functions on Rectangle to do the mirroring):
  // First compute the target copies in the 4 mirrors
  let target1 = target.copy();
  let target2 = square.mirrorTop(target);
  let target3 = square.mirrorRight(target);
  let target4 = square.mirrorTop(square.mirrorRight(target));
  target1.guardLabel = 1;
  target2.guardLabel = 2;
  target3.guardLabel = 3;
  target4.guardLabel = 4;
  // for each mirrored target, compute the four two-square-length translates
  let mirroredTargets = [target1, target2, target3, target4];
  let horizontalShift = 2 * square.width();
  let verticalShift = 2 * square.height();
  let translateLeft = new Vector(-horizontalShift, 0);
  let translateRight = new Vector(horizontalShift, 0);
  let translateUp = new Vector(0, verticalShift);
  let translateDown = new Vector(0, -verticalShift);

  let translatedTargets = [];
  for (let i = 0; i < mirroredTargets.length; i++) {
    let target = mirroredTargets[i];
    translatedTargets.push([
      target,
      target.add(translateLeft),
      target.add(translateDown),
      target.add(translateLeft).add(translateDown),
    ]);
  }
Step 3, computing the midpoints:
  // compute the midpoints between the assassin and each translate
  let translatedMidpoints = [];
  for (let i = 0; i  t.midpoint(assassin)));
  }
Step 4, returning the guards back to the original square, is harder than it seems, because the midpoint of an assassin-to-target-copy segment might not be in the same copy of the square as the target-copy being fired at. This means you have to detect which square copy the midpoint lands in, and use that to determine which operations are required to invert. This results in the final block of this massive function.
  // determine which of the four possible translates the midpoint is in
  // and reverse the translation. Since midpoints can end up in completely
  // different copies of the square, we have to check each one for all cases.
  function untranslate(point) {
    if (point.x  square.bottomLeft.y) {
      return point.add(translateRight);
    } else if (point.x >= square.bottomLeft.x && point.y <= square.bottomLeft.y) {
      return point.add(translateUp);
    } else if (point.x < square.bottomLeft.x && point.y <= square.bottomLeft.y) {
      return point.add(translateRight).add(translateUp);
    } else {
      return point;
    }
  }

  // undo the translations to get the midpoints back to the original 4-mirrored square.
  let untranslatedMidpoints = [];
  for (let i = 0; i  square.topRight.x && point.y > square.topRight.y) {
      return square.mirrorTop(square.mirrorRight(point));
    } else if (point.x > square.topRight.x && point.y <= square.topRight.y) {
      return square.mirrorRight(point);
    } else if (point.x  square.topRight.y) {
      return square.mirrorTop(point);
    } else {
      return point;
    }
  }

  return untranslatedMidpoints.map(unmirror);
And that’s all there is to it!
Improvements, if I only had the time
There are a few improvements I’d like to make to this puzzle, but haven’t made the time (I’m writing a book, after all!).
- Be able to drag the guards around.
- Create new guards from an empty set of guards, with a button to “reveal” the solution.
- Include a toggle that, when pressed, darkens the entire region of the square that can be hit by the assassin. For example, this would allow you to see if the target is in the only possible safe spot, or if there are multiple safe spots for a given configuration.
- Perhaps darken the vulnerable spots by the number of possible paths that hit it, up to some limit.
- The most complicated one: generalize to an arbitrary polygon (convex or not!), for which there may be no optional solution. The visualization would allow you to look for a solution using 2-4.
Pull requests are welcome if you attempt any of these improvements.
Until next time!
Want to respond? Send me an email, post a webmention, or find me elsewhere on the internet.