It’s April Cools again.
For a few summers in high school and undergrad, I was a day camp counselor. I’ve written before about how it helped me develop storytelling skills, but recently I thought of it again because, while I was cleaning out a closet full of old junk, I happened upon a bag of embroidery thread. While stereotypically used to sew flowers into a pillowcase or write “home sweet home” on a hoop, at summer camps embroidery thread is used to make friendship bracelets.
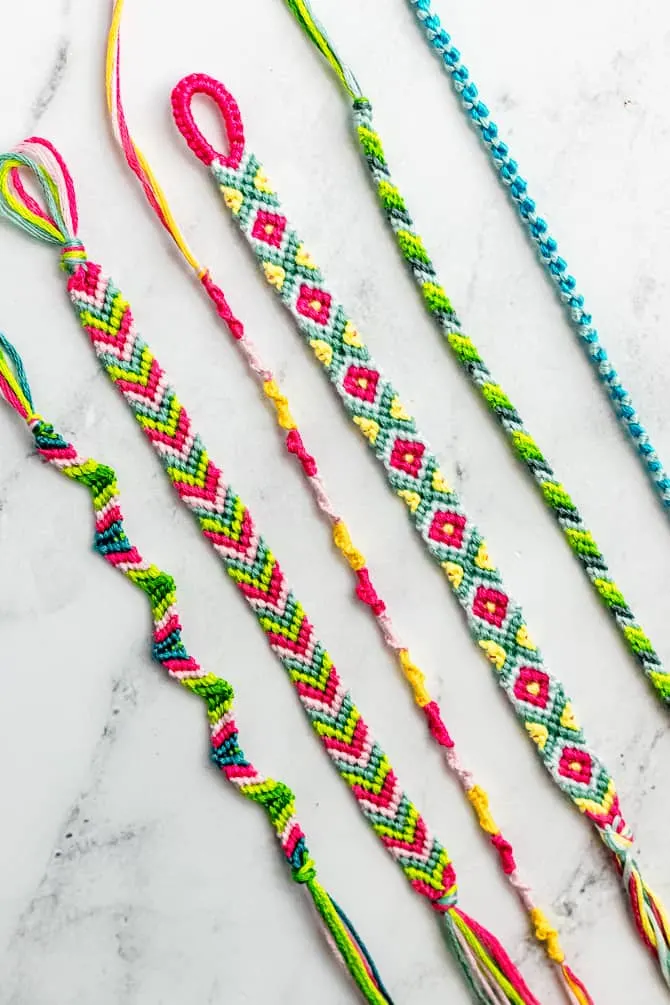
Image from SarahMaker
For those who don’t know, a friendship bracelet is a simple form of macramé—meaning the design is constructed by tying knots, as opposed to weaving or braiding. Bracelet patterns are typically simple enough for a child of 8 or 9 to handle, albeit with a bit of practice. They are believed to originate among the indigenous peoples of the Americas, where knots were tied into string to track time and count, but in the United States their popularity arose among children as a gift-giving symbol of friendship. As the lore goes, when someone gives you a friendship bracelet, you put it on and make a wish, and you must leave it on until the bracelet naturally falls off, at which point your wish comes true.
Kids took the “falling off naturally” rule very seriously, but in retrospect I find a different aspect more fascinating. Tying friendship bracelets is a communal activity. It’s a repetitious task that you can’t do absentmindedly, it takes a few hours at least, and you have to stay put while you do it. But you can enjoy shared company, and at the end you’ve made something pretty. Kids would sit in a circle, each working on their own bracelet, sometimes even safety pinning them to each others backpacks in a circle-the-wagons manner, while chit chatting about whatever occupied their minds. Kids who were generally hyper and difficult to corral miraculously organized themselves into a serene, rhythmic focus. And it was pleasant to sit and knot along with them, when the job wasn’t pulling me away for some reason.
Thinking of this makes me realize me how little I’ve experienced communal activities since then. It has the same feeling of a family sitting together making Christmas cookies, or a group of artists sitting together sketching. People complain about the difficulty of making friends in your thirties, and I wonder how much of that is simply because we don’t afford ourselves the time for such communal activities. We aren’t regularly around groups of people with the sort of free time that precipitates these moments of idle bonding.
Without any thoughts like this at the time, I nevertheless developed friendship bracelet making as a specialty. I spent a lot of time teaching kids how to tie them. I’m not sure how I grew into the role. I suspect the craft aspect of it tickled my brain, but at the time I was not nearly as conscious of my love for craftsmanship as I am now. I learned a dozen or so patterns, and figured out a means to tie a two-tone pattern of letters, with which I could write people’s names in a pixelated font. It impressed many pre-teens.
Ten years later, this bag of string managed to travel with me across the US through grad school and many apartments, and I thought maybe I could find a math circle activity involving knots and patterns and…well, something mathy. My attempt at making this an activity was a disaster, but not for the reason I thought it might be. It turns out eight year olds don’t yet have enough dexterity to tie bracelets accurately or efficiently enough to start asking questions about the possible knot patterns. I was clearly still re-acclimating to the ability range typical of that age.
After that I figured, why not try making one again? In the intervening years, I had occasionally seen a pattern that clearly wasn’t constructed using the techniques I knew. To elaborate, I’ll need to briefly explain how to make a simple bracelet. Compared to other forms of fiber arts, it’s quite simple, and requires nothing like a loom or knitting needles. Just the string and something to hold the piece in place.
You start by tying all your threads together in a single knot at one end, tape or pin it down for tension, and spread out your strings, Then, using the left most string, and gradually moving it from left to right, you proceed to tie “stitches,” where a single “stitch” consists of two overhand knots of the left string over the right string. As a result of one stitch, the “leading” string (the left most one, in this case) produces the color that is displayed on top, and it “moves” rightward one position. Doing this with the same string across all strings results in a (slightly diagonal) line of stitches of the same color. Once you complete a single row, the now-formerly leading string is on the rightmost end, and you use the leftmost string as your new leading string.
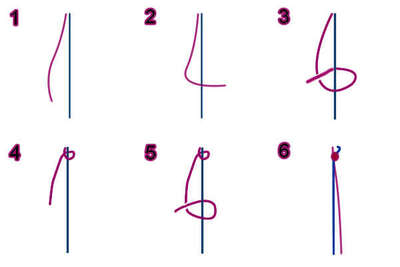
A diagram showing how to tie a single stitch with two threads. Considering the “red” stitch as the leading string, this “forward stitch” leaves the leading color on top and moves the leading string one position to the right. Steps 3 and 5 are tying the same overhand knot twice, but the position of the string from step 4 is what shows the color in the final stitch.
A “stripe” pattern, showing the progression of forward stitches. Image source
The stripe pattern is usually one of the first patterns one learns because it’s very simple. But you can image that, by tying strings in different orders, and judiciously picking which string is the “leading” string (i.e., which string’s color is shown in each stitch), you can make a variety of patterns. Some of them are pictured at the beginning of this article. However, the confounding patterns I saw couldn’t have been made this way, in part because, first off, they were much more intricate than is possible to construct in the above style (there’s clearly some limiting structure there). And second, they used more colors than the width of the bracelet, meaning somehow new colored threads were swapped in and out part way through the design. See, for example, these cow bracelets.
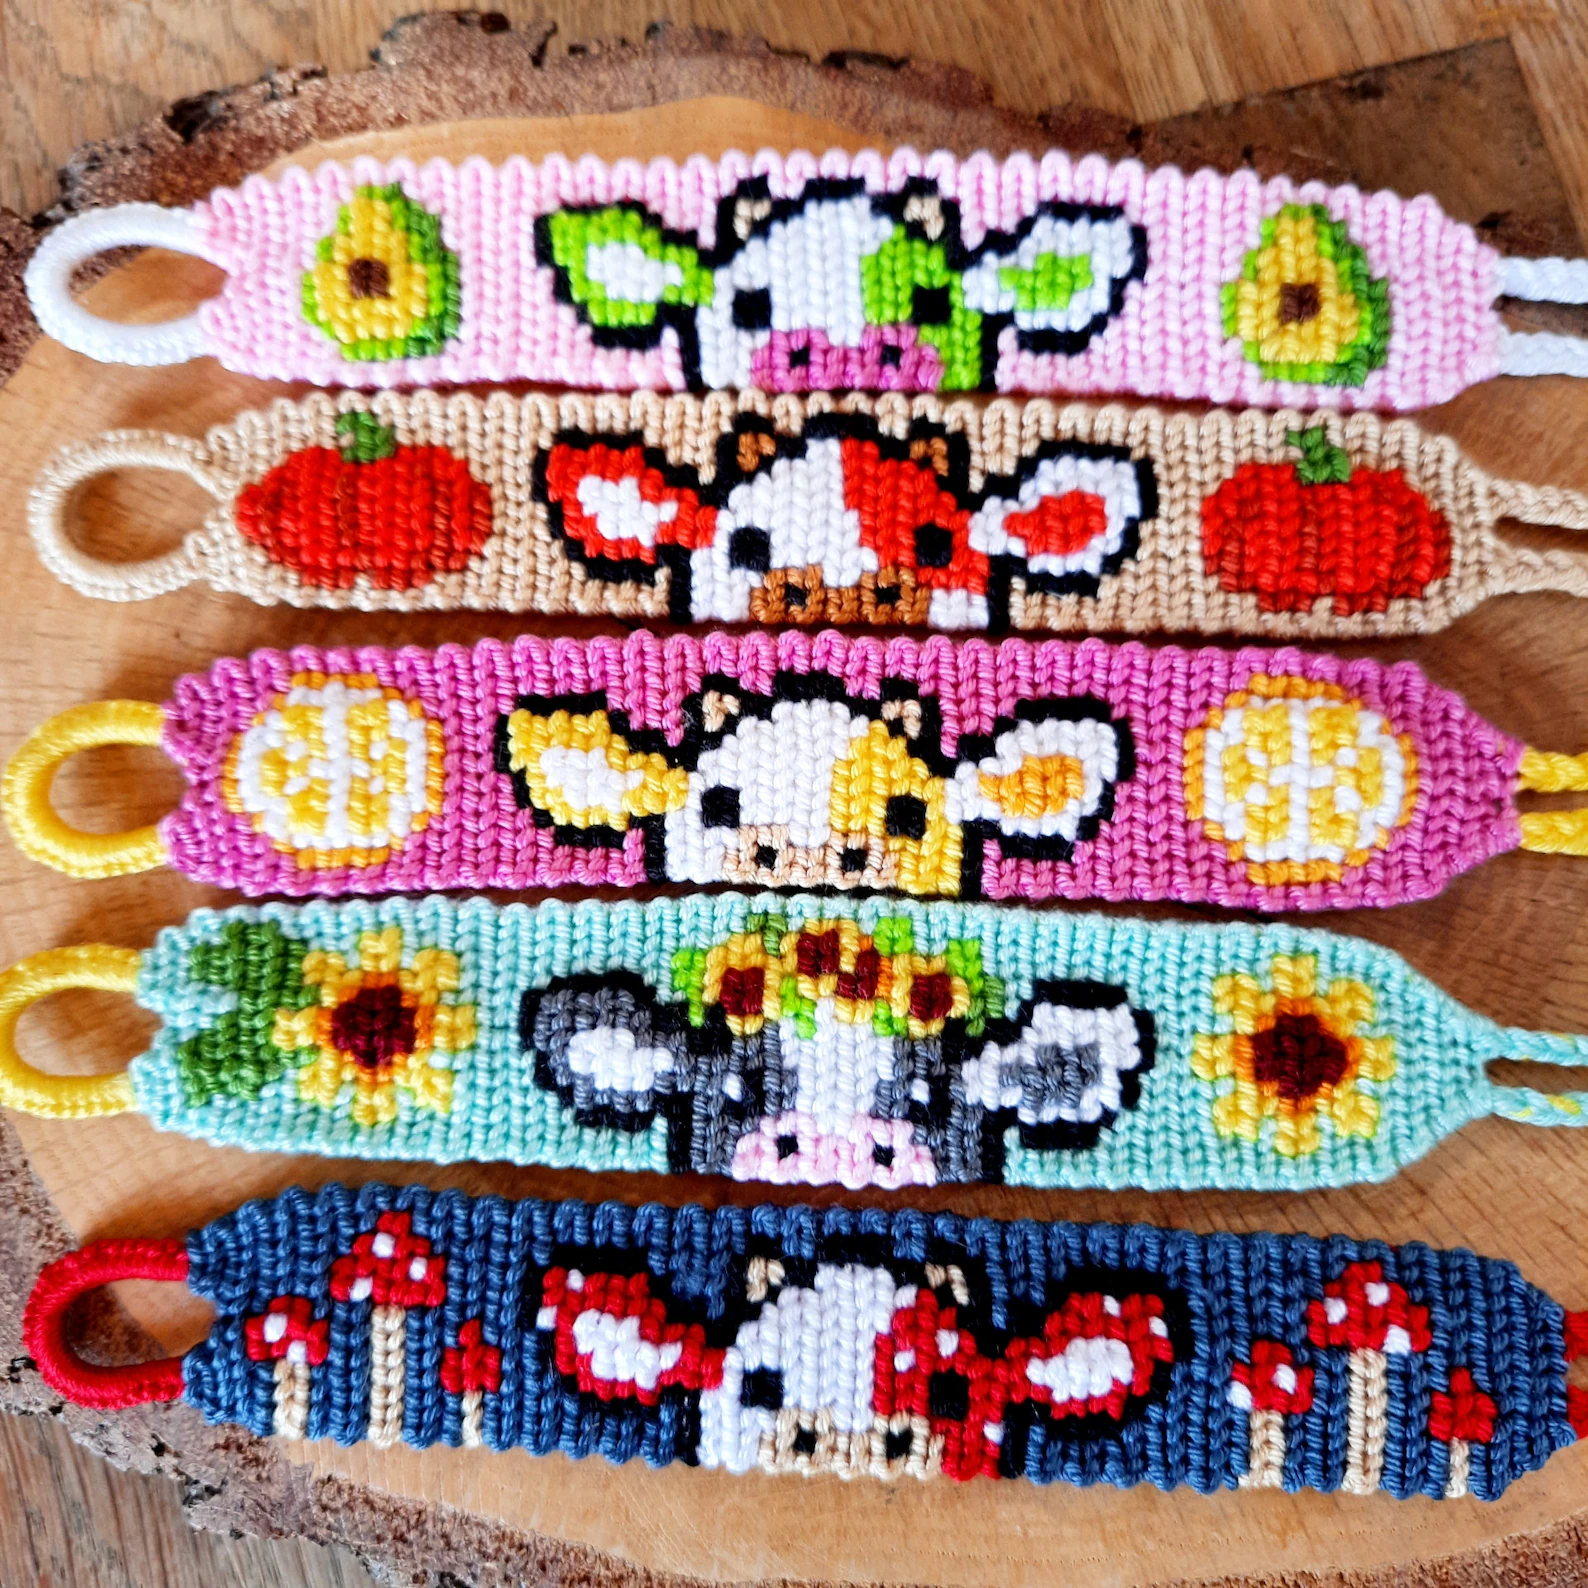
This cute cow couldn’t have been done with a simple stitch pattern. Image source
Otherwise having no experience with fiber arts, I was clueless and curious about how this could be done. After some searching I found so-called alpha bracelets, which cracked the case wide open.
Instead of using strings both as the structure to hold knots and the things that tie the knots, an alpha bracelet has strings that go the length of the bracelet, and serve no purpose but to have knots tied on them. By analogy with weaving (which I knew nothing about a few months ago), they distinguish warp and weft threads, whereas “classical” bracelets do not. And because we’re tying knots, the “warp” threads’ color is never shown, except at the ends when being tied off.
To get more colors, there’s a slightly intricate process of “tying in” a new thread, where the old leading string is threaded between the two overhand knots of a new stitch and passes underneath the whole composition. Masha Knots, a bracelet YouTuber, has perhaps the most popular tutorial on the internet on how to make alpha bracelets. But through this search, I also discovered the website braceletbook.com, which has a compendium of different patterns. The diagrams on that site clarified for me one obvious difference between “classical” and alpha bracelets: the stitches of classical bracelets lie on a sheared lattice, while alpha bracelets lie on a standard Euclidean grid. And you can easily generate notation describing how to tie a pattern.
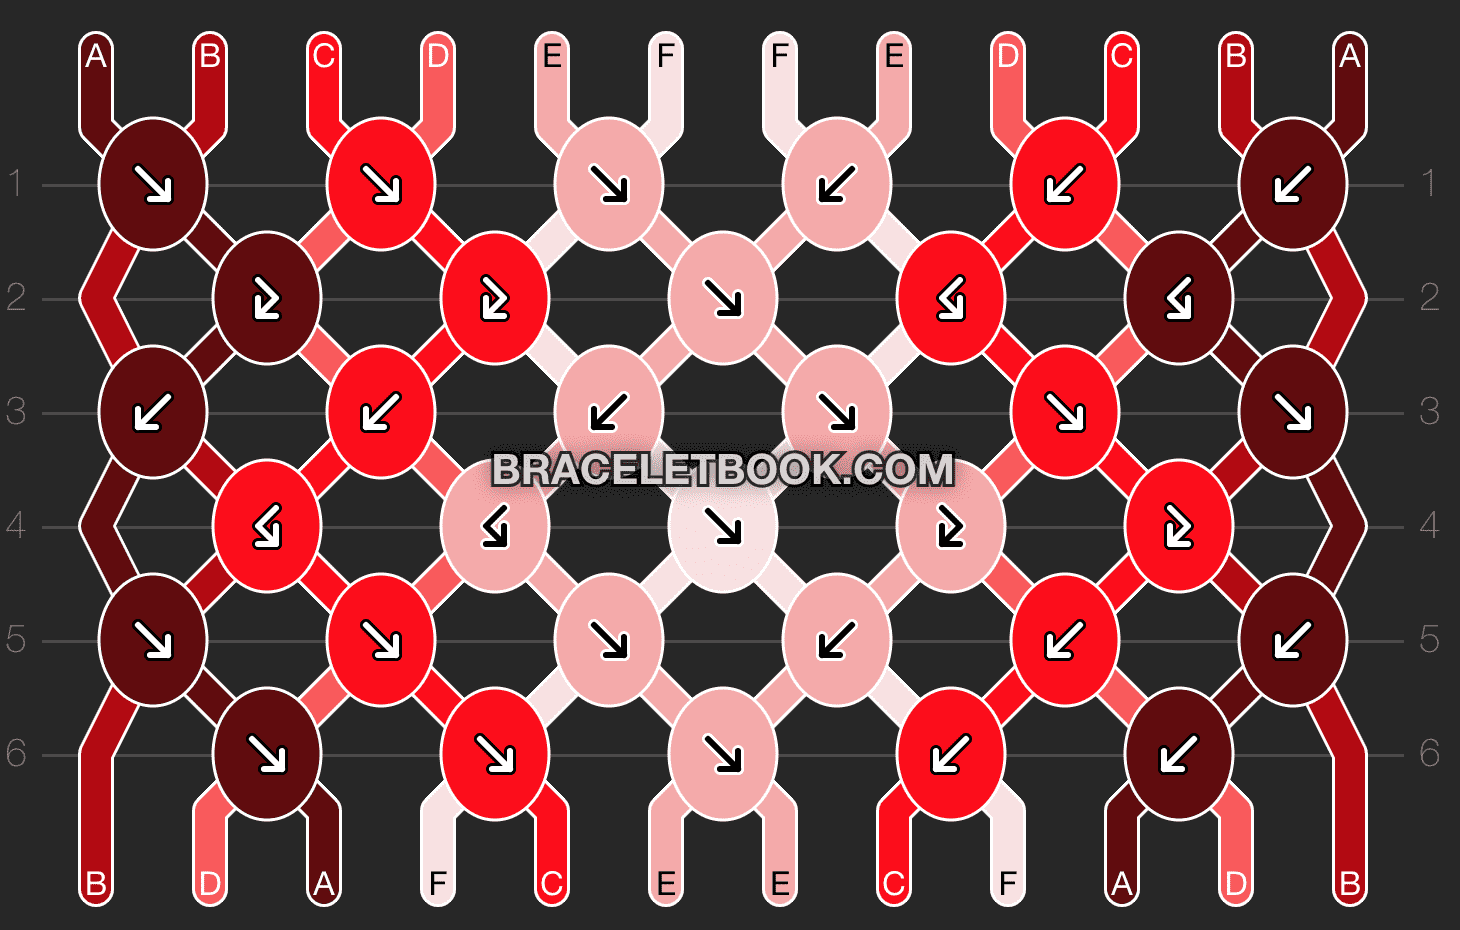
A classical bracelet diagram from braceletbook.
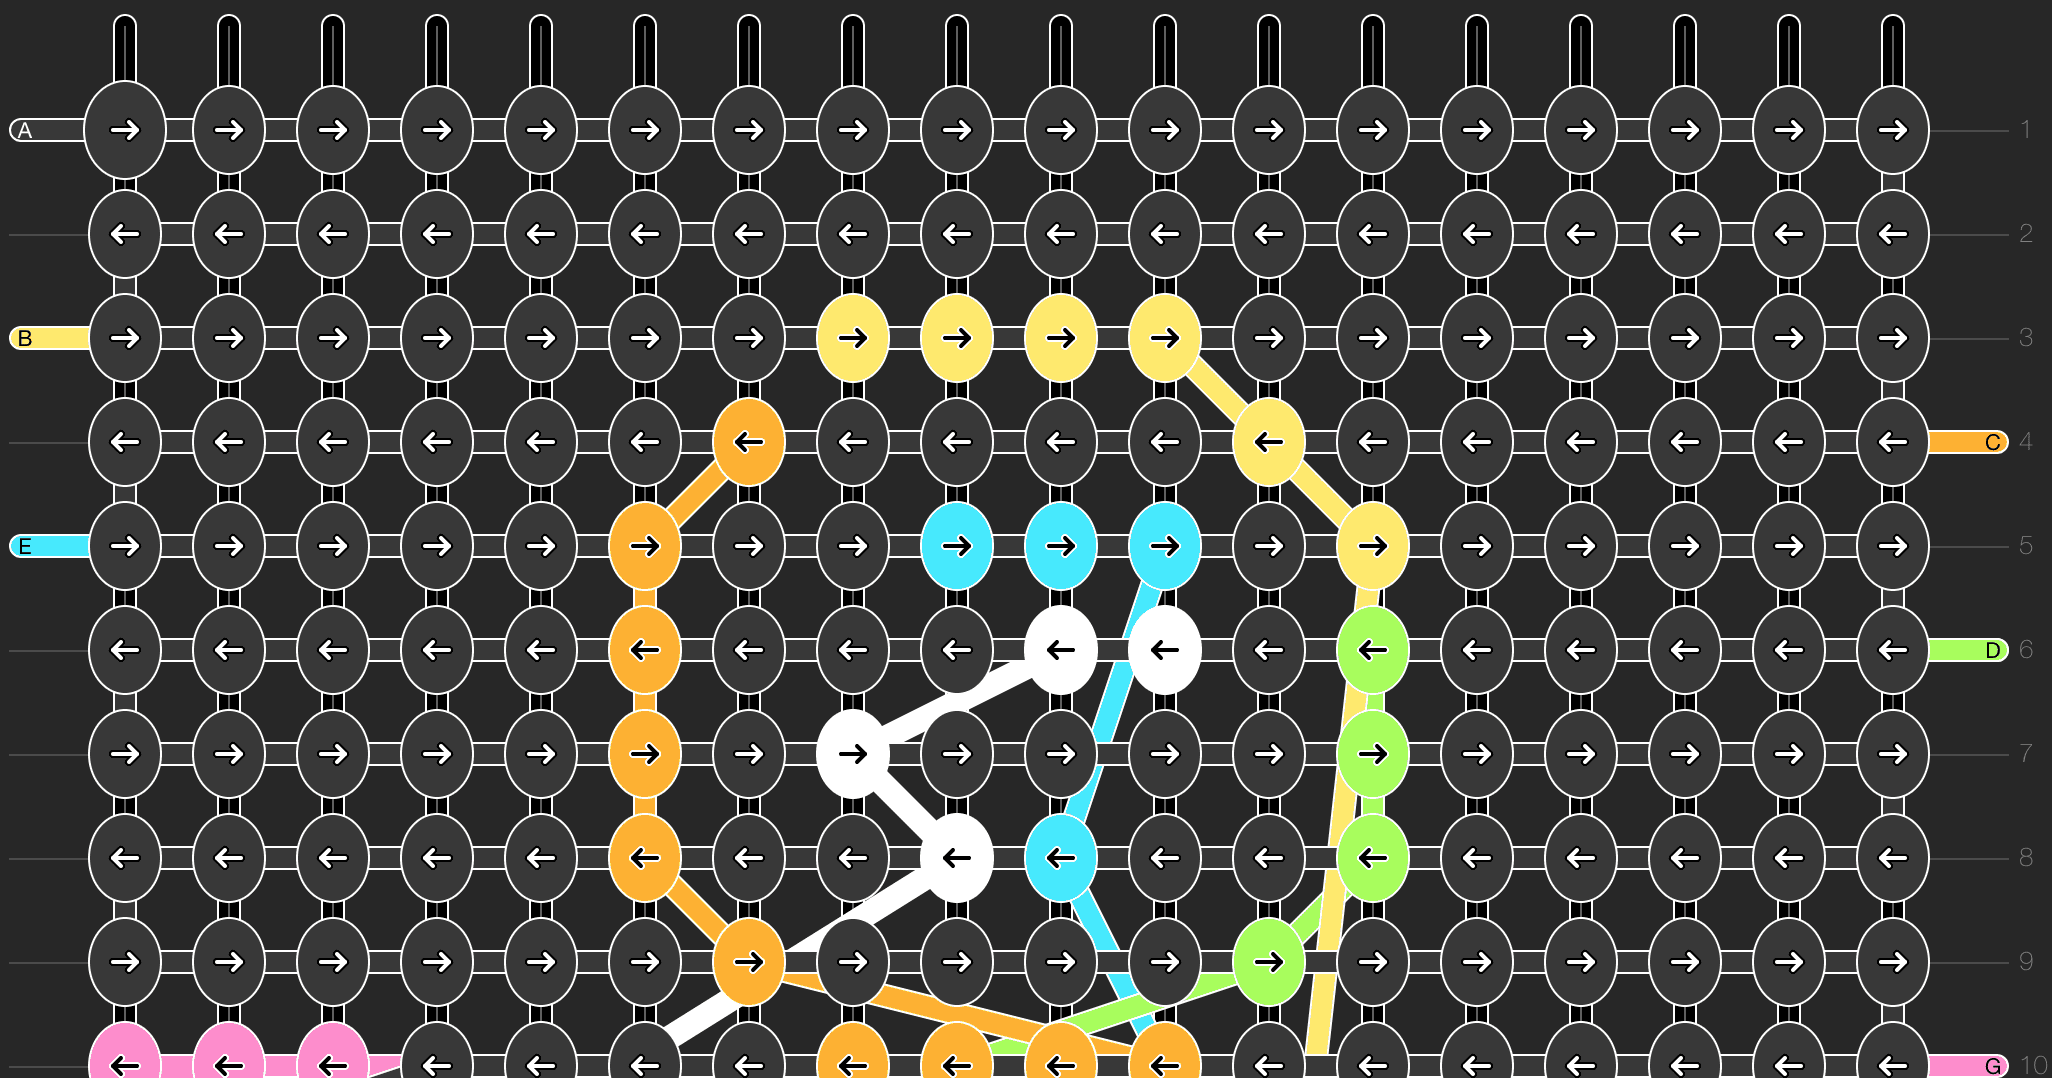
Part of an alpha pattern diagram from braceletbook.
The alpha technique allows you to draw pixel art into your bracelet. And elaborate alpha patterns tend to be much larger than is practical to wear on your wrist. It effectively becomes a kind of miniaturized macramé tapestry.
So I wanted to try my hand at it. Since I’m now in my thirties and friendship isn’t what it used to be, I wasn’t quite sure what sort of bracelet to make. Thankfully my toddler loves Miyazaki films, so I made him this No Face bracelet.
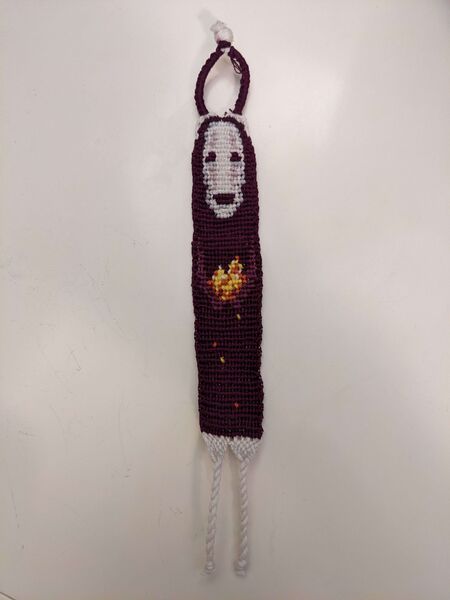
No Face, made from this pattern.
It’s a little rough around the edges, but not bad for my first one. And a toddler doesn’t care. He’s just happy to have a No Face friend. After that I started on a new pattern, which is currently about 80% done. Continuing with the Japanese theme, it’s a take on Hokusai’s Great Wave.
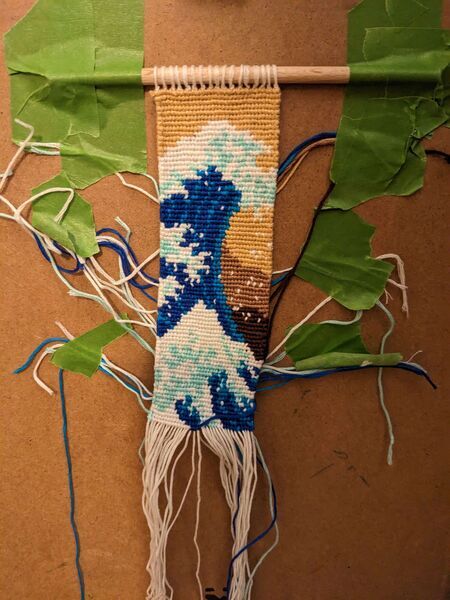
The Great Wave, from this pattern.
If you look closely you can see a few places where I messed up, the worst being the bottom right where I over tightened a few stitches on the edge causing the edge to slant. Because this one was so large I fastened the end to a small dowel, which makes it look like a scroll.
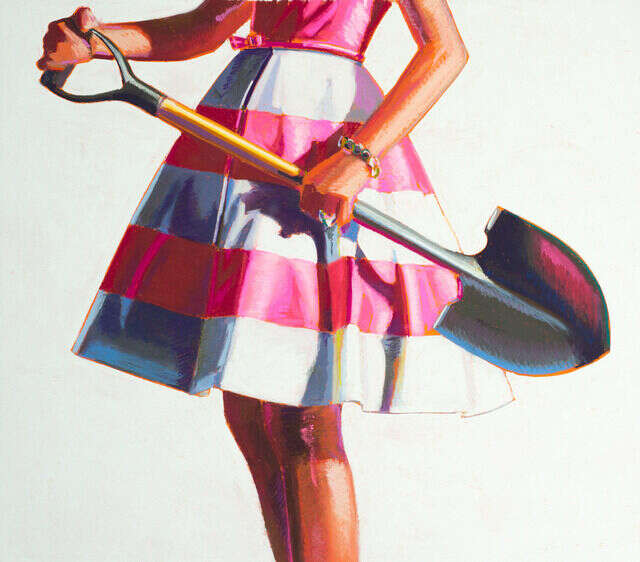
Again, since alpha bracelets are knotted pixel art tapestries, I figured why not put these on my wall and make a tiny gallery. And there are always a handful of contemporary artists whose art I adore, but whose prices are too high, or whose best pieces have been sold, and who don’t make prints. So I will never get to put on my wall. Take, for example, Kelly Reemtsen, known for her dramatically posed women in colorful 50’s dresses wielding power tools. I emailed her years ago asking about prints and she replied, “I don’t do prints.” Today she apparently does, but it’s still extremely hard to find any prints of her good pieces.

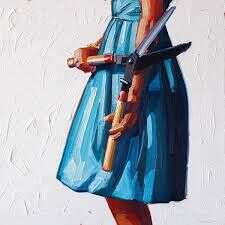
The first time I saw one of her pieces (in a restaurant on Newbury street in Boston), it really struck me. But as I’ve saved up enough money to afford what her art used to cost, so has she gained enough fame that her prices stay perpetually impractical. I even tried painting my own imitation of one of her paintings, though it’s not all that good.
So instead I decided to convert one of her pieces to pixel art, and tie a friendship bracelet tapestry myself. Here’s my pixel-art-in-progress. It still needs some cleaning up, and I’m not sure how to get exactly the right colors of thread, but I’m working on it.
My in-progress pixel-art version of one of Reemtsen’s pieces, which I intend to friendship-braceletize
In my life, this craft has strayed quite far from communal tying and gift giving. But it still scratches a certain itch for working with my hands, and the slow, steady progression toward building something that is unhindered by anything outside your own effort. Plus, each stitch takes only a few seconds to tie, and unlike woodworking or knitting, it has no setup/suspend/teardown time. You just put the strings down. Having an ongoing project at my desk gives me something quick to do when my programs are compiling, or when I’m in a listening-only meeting. Instead of opening a social media site for an empty dopamine hit, or getting mad about someone else’s bad takes, or playing a game of bullet chess, I can do 1/500th of something that will beautify my life.
Want to respond? Send me an email, post a webmention, or find me elsewhere on the internet.